To get into the winter spirit, it is always nice to bake up some fun treats! Join me as I make a variety of wintery treats with my own little additions and changes. Each treat has a recipe to match and before reading each section I advise you look over the recipe first.
Peppermint Marshmallows:
The recipe I used to make these fluffy marshmallow treats is from Ashley Rodruigez on her blog “Not Without Salt” (you can find it here). Before you attempt this recipe I would advise against making it by yourself. This recipe involves heating sugar to high temperatures, and it’s always better to have people around in case of any hot sugar-related incidents. Starting off, you need a stand mixer. Theoretically, you could use a hand held mixer, but the marshmallows require 20+ minutes of consecutive mixing and I would not recommend doing that by hand. You also will need a candy thermometer; you cannot use a normal thermometer, or a meat thermometer. A candy thermometer is specially designed to withstand high temperatures because it needs to stay in the pot or saucepan the entire time you are heating your sugar.
I followed the recipe very carefully—when dealing with making candy and heated sugars it is best to not mess with the ratios very much. A useful tip to keep the heated sugar from rising and sticking to the inner walls of the pot is to take a pastry brush and a cup of water to brush the walls of the pot with. When you are applying the water, you should brush the water on about a centimeter above where the sugar is. The water will sizzle because the pot will be very hot; this step is in no way required, but it helps with the cleaning process later on.
To make the marshmallows just that much more wintery, I decided to add peppermint extract in addition to the vanilla extract. I used one teaspoon of Watkins Pure Peppermint Extract. You can use McCormick’s peppermint extract, but McCormick adds water to theirs so it has more of a sugary peppermint taste, and I personally like to have more of that super minty taste. If you decide to add peppermint extract you should add it at the same time that you would add in the vanilla. Vanilla bean paste can be substituted for the vanilla bean pod quite easily if necessary. I used Heilala Pure Vanilla Paste and looked at the ratio on the back label that said one teaspoon equals one vanilla bean pod.
A useful tip to make your cleaning quicker is right after you pour the sugar mixture into the gelatin, put your pot or pan into the sink and then fill the pot with warm-hot water. This will help the sugar dissolve while you are still working. Don’t put cold water in, this will cool and harden the sugar faster and make it more difficult to clean.
Lastly, when you are pouring your mallow mixture into your prepared pan and the recipe says to press the mixture in the pan: oil your hands! Like a lot! If you do not oil your hands with vegetable oil, the process becomes very messy. The recipe says that you need to let your marshmallow mixture rest for at least four hours before cutting, but I let it sit overnight just to make sure it was fully set and ready to go. I used a counter scraper to cut them and I tried to keep it as clean as I could. You may need to clean off your blade once or twice just to get any residue off so you can make clean cuts.
To toss the marshmallows in the cornstarch-powdered sugar mixture, I used a one to one ratio, putting a half cup of each in a gallon sized bag; I put eight or ten mallows in at a time and then shook the bag pretty roughly until they were sufficiently covered in the mixture. You should shake the bag pretty roughly, but make sure it is in a plastic ziploc so it doesn’t open or it will spread everywhere in a massive cloud of sugary dust.
This recipe is great for the winter months. I made these with peppermint extract but they are just as good as plain vanilla flavored. They are good for at least a month or two but after a month they start to get tough. On the same website there is an amazing recipe for hot chocolate mix, which is the only hot chocolate that I drink.
Gingerbread cookies:
Gingerbread cookies are pretty standard for winter dessert fun, and as such they are the next treat up. The recipe I used for the gingerbread is also Ashley Rodruigez’s, and can be found here. I mostly followed the recipe and instructions, with the exception of real grated ginger instead of ginger powder. I frosted them with a basic royal icing (water and powdered sugar), which can be made easily by adding water to your powdered sugar until you are happy with the consistency.
Personally I do not like molasses cookies so I didn’t love these, but if I were to make them again I would add an additional teaspoon or two of fresh ginger because I really like the ginger taste to be strong and in your face, whereas this recipe was much more of a subtle flavor.
Grebel:
I wanted to attempt something a little different than my normal baking pattern for our next treat, and my mom suggested that I make some grebel. When she mentioned this, I had no idea what grebel was, so I did some light Googling. I found that grebel is an Eastern European style of cake donut popular in Germany. The recipe I used to make the grebel is from the cooking blog “Just A Pinch” and you can find it here. I found the recipe to be fairly vague, so while I used the measurements it gave, I improvised some of the more general steps.
First, I added all the ingredients together as stated in the instructions and froze it in four sections. I left the dough to freeze overnight, but don’t leave the dough for more than one night otherwise it could disrupt the composition and make your grebel very dense. The next day when I took out the dough to thaw, it took a little more than two hours for it to get to room temperature. When it had thawed, I found that the dough was a bit soft (the way you can tell if your dough is soft is by how sticky it is, if your dough sticks to your rolling pin or just your hand it is too soft), so I added an additional half cup of flour and lightly kneaded the dough until it was fully combined. The recipe calls for you to roll your dough out to one eighth of an inch and cut them into five inch squares, but I only rolled my dough to about a third of an inch thick and cut them into three by four inch rectangles.
For the oil I added about 1 inch of vegetable oil in a cast iron skillet and heated the oil on my stove top burner set to high until it reached 350°F. I took the temperature of the oil with a meat thermometer and once it reached 350°F I changed the burner to medium. I would once again like to state that I do not advise solitary grebel-frying: in case of an oil spill it’s important to have another person around to help you out.
I put two of the rectangles in at a time and waited to flip them until they were golden brown. When flipping the grebel you can use kitchen tongs or you could use two chopsticks. I personally like to use two chopsticks because I find it easier and more controllable. Whatever you do, do it with caution because this is the most dangerous step. Once they were finished cooking in the oil, I used a mesh serving spoon to scoop them out and place them on a cooling rack with two layers of paper towels underneath to catch any oil that drips off of the grebel.
The classic topping for grebel is powdered sugar. If you choose to do this you can sift or sprinkle powdered sugar over the top of the grebel. When topping your grebels, you must do it no more than one minute after they have left the oil; they need to be hot when you top them, otherwise your topping of choice will not stick to the grebel. I made some with powdered sugar but I also made some with a cinnamon sugar mix and I found the cinnamon sugar topped ones to be better than the powdered sugar. I found that it was lacking in salt, so I recommend that you add a bit of salt to whatever you top your grebel with. Do not add the salt to the dough itself, it will disrupt the chemical makeup of the dough and it will not set properly.
As you can see I twisted the dough for the powdered sugar topped ones to do a more traditional looking grebel but they were quite dense. The cinnamon and sugar topped ones that were just rectangles were much more airy and light. I didn’t measure out my cinnamon sugar mix, I just went by taste but I eyeballed about one cup sugar, a little more than a tablespoon of cinnamon, and maybe about a tablespoon or two of salt. But I advise you to just go by taste and whatever you like best.
They are good warm and fresh but they don’t keep well; they are only crunchy and light within the first five-ish hours of frying, and the next day they become stale and chewy.
Cranberry Bliss Bar:
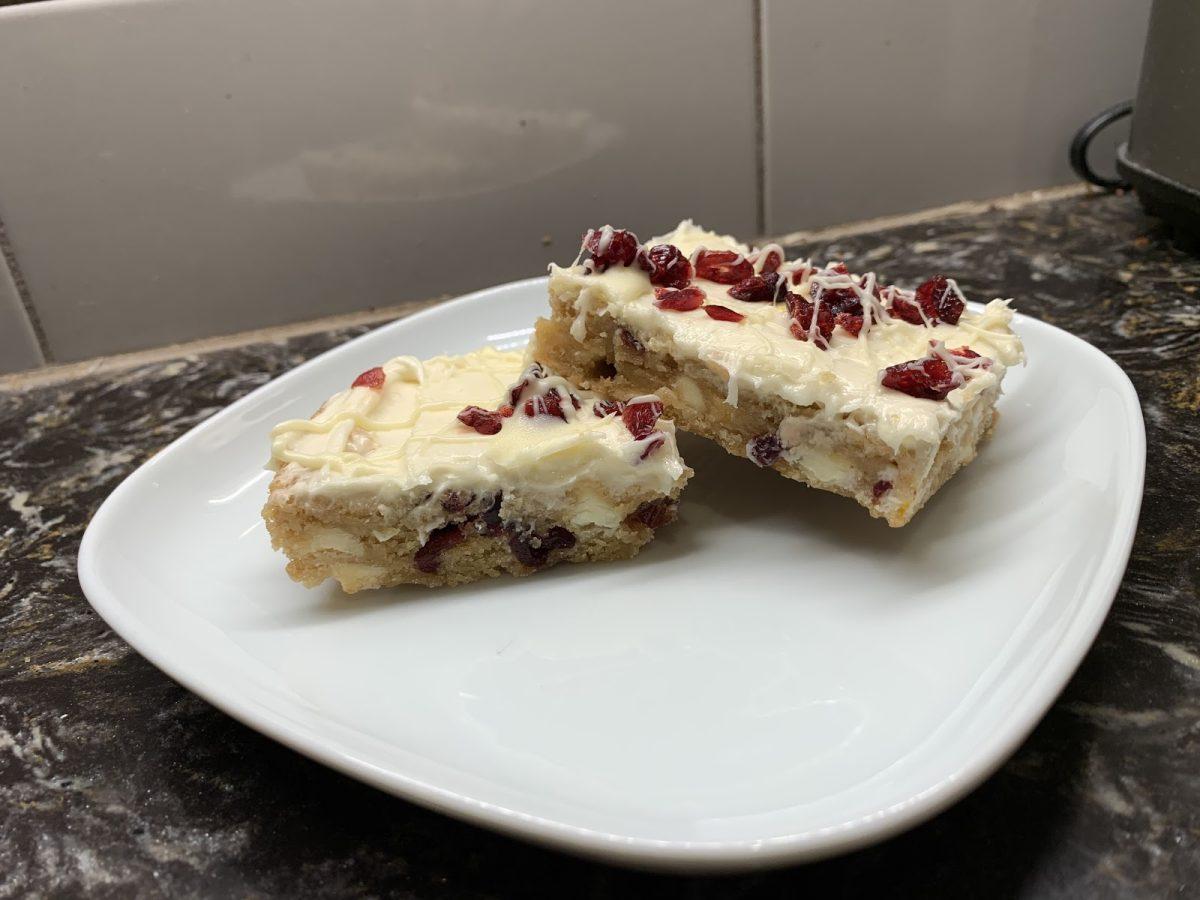
Last but not least, the dessert I was most excited for: remaking the Cranberry Bliss Bar from Starbucks! If you haven’t tried it before, this recipe is a delicious remake of the Starbucks favorite. For this recipe I looked at the cooking blog “Belle of The Kitchen” and you can find it right here.
I followed the recipe pretty carefully because I really wanted to get an accurate remake, but just like all of the other recipes, there were some replacements. First of all, I despise orange extract. I find that it usually is far too bitter or has too much added sweetener so instead I put in two teaspoons of orange zest—when you are using the fresh version of something instead of the extract you need to double it so the flavor comes through. I also substituted one teaspoon of fresh ground ginger in place of the powder. And lastly I used one teaspoon of Heilala Pure Vanilla Paste in place of vanilla extract.
For baking the bar the recipe says that you should just bake until the edges are golden brown. To make sure I took the sheet out in time I checked on it every ten minutes, and took it out of the oven after twenty five-ish minutes. Once the bar is out of the oven you need to let it cool to room temperature, and because I am impatient I set my pan by an open window to cool faster. The main floor of the house got somewhat cold, but it only took an hour for the bar to cool completely so I’d call that a win.
For the frosting I made the same substitutes for the orange and vanilla extract that I did for the bar. When topping the bar I couldn’t find any designated baking chocolate so I melted some of the leftover white chocolate. For storing the bar, the recipe says to refrigerate them but there was no room in my fridge so I put them in my freezer and covered them in plastic wrap to prevent them from drying out. Putting the bars in the freezer won’t affect the bars in any noticeable way, but you might want to let them warm up a bit before eating if you do freeze them.
The end product was very good and I plan on making them again soon. But the next time I make them I will finely chop the craisins that go in the bar and put fewer white chocolate chips in. I felt that the white chocolate was a bit overwhelming and you couldn’t taste the bar itself very much. Lastly I will make the frosting less sweet; the combination of the bar and the frosting makes a very rich flavor profile and with a less sweet frosting more flavors can come through. I hope you attempt one or two of these recipes yourself, and if you do or have any questions please feel free to email me at [email protected] and I would be happy to help!


